Giving Haku a little light
Before I actually complete what I was doing before with the new Haku model, I decided to fit in lighting calculations to see what the model looked like if lighting was applied. It changes a few things.
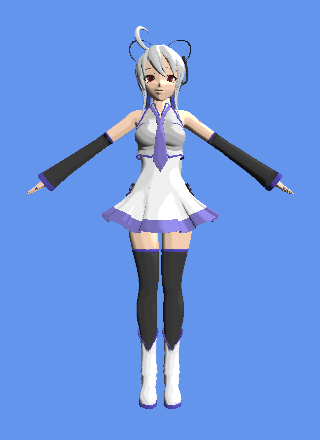
First, the model again without any lighting. I fixed the aspect ratio from the last post, though there are some vertex quirks with the conversion.
Yeah, pretty nondescript, isn't it? Let's see if we can't make Haku come alive with some proper lighting. The model only has diffuse color defined, so let's start off with a simple Lambertian lighting model with a directional light.
Color = DiffuseColor * (dot(Normal, -LightDirection) + 1.0) / 2.0;
That's the basic equation. For those of you wondering, the dot product produces a range of values within [-1.0, 1.0], but if we don't want to multiply by negative values, we'll have to convert them to a range we want. Here I'm converting the range [-1.0, 1.0] to [0.0, 1.0] before multiplying.
Well, that sure looks better. Amazing what a little lighting can do, ain't it?
Maybe that looks a little too realistic for our tastes, though. Sure, it looks like a mannequin of Haku, but what if we wanted to make this all look like she were hand drawn instead? That's where toon rendering comes in to play.
The classic XNA example does toon rendering in a preprocessing rendering pass, with the amount of light hitting the pixel determining just how dark or light the pixel is. This means we have to change how we handle a pixel's color intensity, but we can base it off the amount of light hitting the pixel.
LightAmount = (dot(Normal, -LightDirection) + 1.0) / 2.0;
Looks familiar, don't it? You can calculate this either in the vertex or pixel shader, but since vertex shaders usually run less times, it's more efficient to calculate it there so the pixel shader can just be passed that value.
We're not going to directly multiply LightAmount to the pixel's color, however. Instead, we can say that if the amount of light on a pixel is... say below 0.4, then we'll multiply the color on the pixel by 0.25. We can even brighten things up more by saying if it's above 0.9, then multiply the color by 1.2 and make it really bright.
Honestly, I just picked a bunch of numbers since I'm not used to doing this.
- LightAmount [0.0, 0.4) → Intensity 0.25
- LightAmount [0.4, 0.7) → Intensity 0.85
- LightAmount [0.7, 0.9) → Intensity 0.95
- LightAmount [0.9, 1.0] → Intensity 1.2
Color = DiffuseColor * Intensity;
Huhn. Lemme just say that part of toon shading is messing around with numbers, and since I haven't really done it before, well... sure I'd say she looks hand drawn, but she's been colored with about as much skill as I would have if I tried it.
By the way, I suck at art.
I mean, it could be what you're going for stylistically, and if you were to stick Haku into the game Killer7, I think she'd fit in looking like that. But there's something more you can do to the model.
So I pulled a bit from what they did in Idolm@ster 2. They talked about it at CEDEC 2012, and their cel shading model would smooth out transitions between intensities. For example, if you moved from LightAmount 0.39 to 0.4, there wouldn't be a jarring transition from one shade of color to the next. Instead, there'd be some smooth interpolation going on so that LightAmounts 0.4 - 0.5 would gradually increase the brightness of the pixel. If you were halfway inbetween at LightAmount 0.45, you'd be halfway between Intensities at 0.55.
You do it this way, and you'll be making intensive use of the lerp (linear interpolation) function in HLSL.
- LightAmount [0.0, 0.3) → Intensity 0.25
- LightAmount [0.3, 0.5) → (lerp)
- LightAmount [0.5, 0.65) → Intensity 0.85
- LightAmount [0.65, 0.75) → (lerp)
- LightAmount [0.75, 0.85) → Intensity 0.95
- LightAmount [0.85, 0.95] → (lerp)
- LightAmount [0.95, 1.0] → Intensity 1.2
... So let's try that.
Lookit that, we're through with our Killer7 lighting scheme, and moved on! To... I dunno, No More Miku? Killer Is Haku?
Pick your poison, but you'll notice how the shadow edges and the highlights are smoother now. Before, there was a sharp edge where lighting turned darker, and any highlights the light made from shining on the model were pretty clear. Now, it's kinda halfway between complete Lambertian shading and cel shading.
I think the PMD Editor works differently, though. I'll post a pic here so you can see how different it is in MMD.
EDIT: Meh... slept on this a while, and I think it just does cel shading with Lambertian lighting. The light's coming in from above, yet none of Haku's legs aren't in shadow because of her skirt.
Aside from this, it looks like the rest of the model uses just the color of the pixel. You'll notice that the colors of each piece of her outfit is the same except when shadowed or highlighted.
The PMD Editor also applies edge detection and edge rendering too, which is another postprocess step. I'll actually get to that in a later post, but for now this is just a quick stop on my way to what I actually wanted to do in my shader. In all honesty, I had other models I could have used instead which got color from texturing, and this entire ordeal could have been avoided if I just stuck with those, but like... Haku.
... And the fact that this has been bugging me for a bit.


